> ## Documentation Index
> Fetch the complete documentation index at: https://docs.kipmox.com/llms.txt
> Use this file to discover all available pages before exploring further.
# Quick Start
> Fix a warning, fix a deployment error, and document your code — a few clicks each.
kipmox works right inside your normal Salesforce workflow. Here are the three things you'll do most — each in a few clicks. For the full details, follow the links to the workflow guides.
## 1. Fix a warning
As you open and save Apex, triggers, and LWC, kipmox flags issues inline — SOQL in loops, DML in loops, security gaps, and more.
The issue is highlighted in your code, with a **kipmox: 💡 Explain & Fix** action above the line.
Click it. kipmox explains the issue and generates a fix with a **Confidence** rating, a **Risk** note, and a **What Changed** summary.
On **Pro**, click **Apply Fix** to apply and save the change automatically (undo anytime with `Cmd+Z` / `Ctrl+Z`). On **Free**, the fixed code is shown in the panel — copy it and paste it into your file.
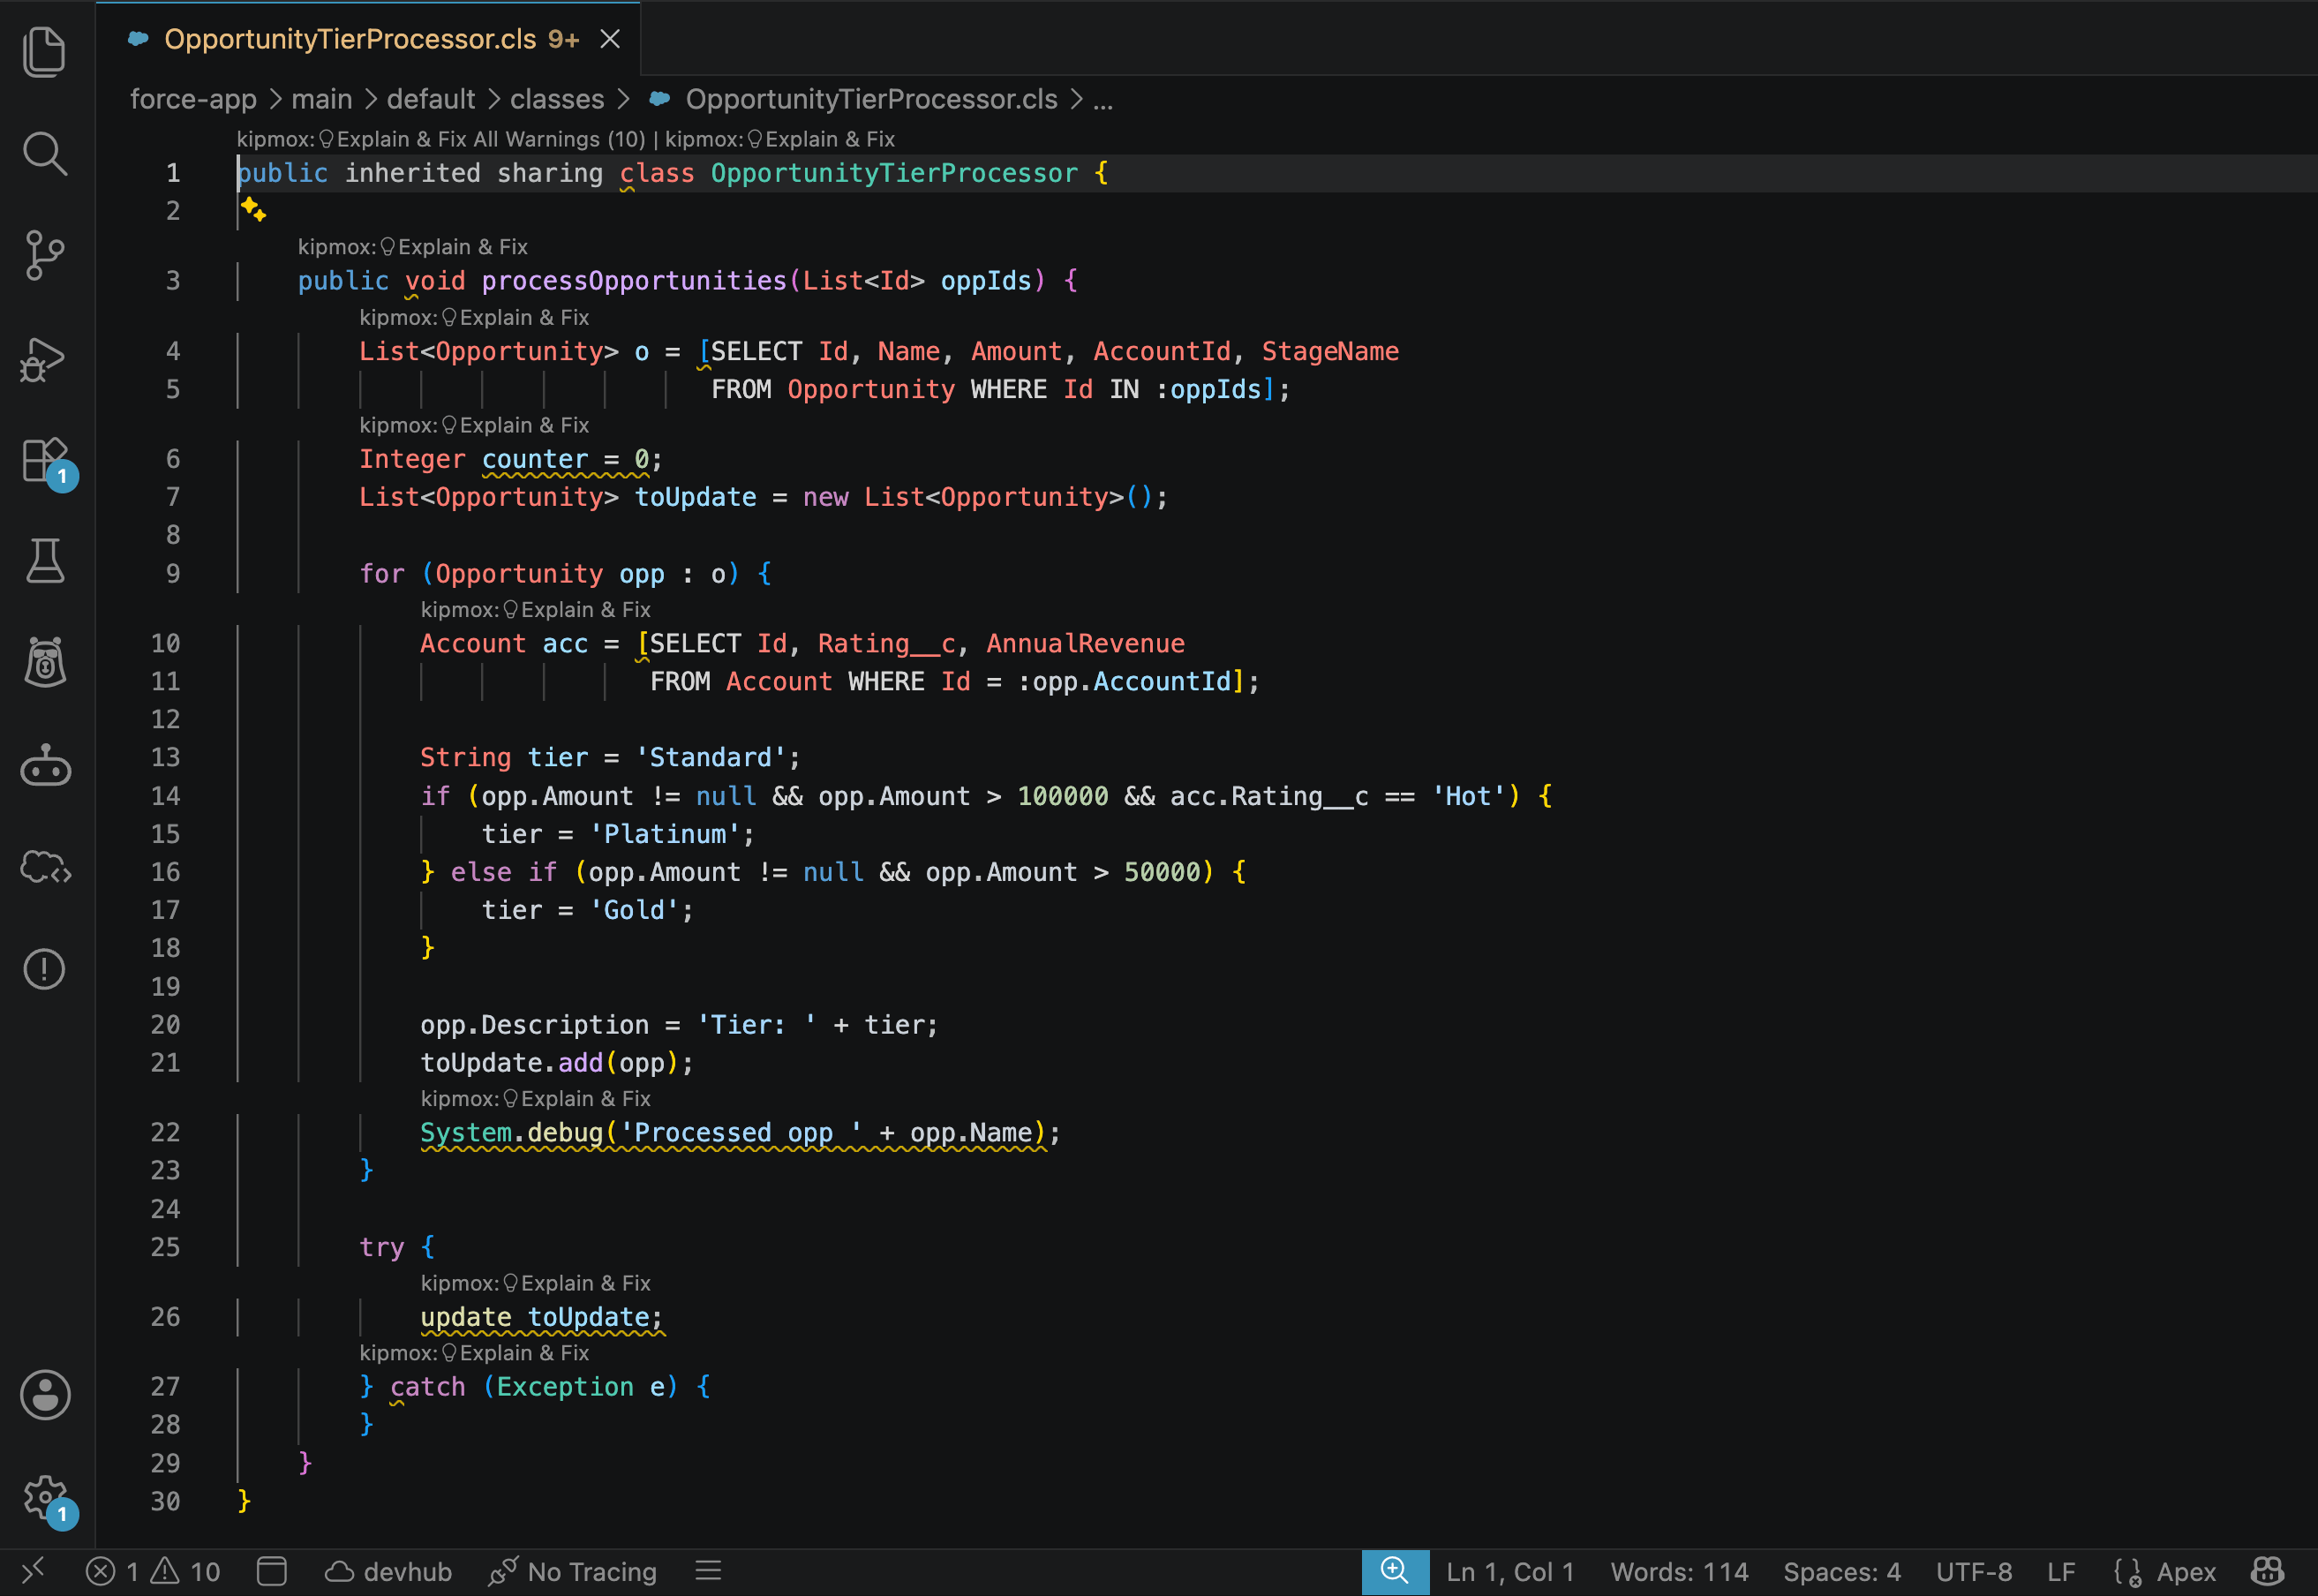 Warnings, Fix All, and custom rules
## 2. Fix a deployment error
Deploy from VS Code — when it fails, kipmox catches every error and helps you fix it.
Right-click a file (or use the Command Palette) and choose **kipmox: Deploy to Org**.
If the deploy fails, the **Deploy Errors** panel opens with every error listed. Click **Explain** on any error for a plain-English analysis and a fix.
On **Free**, copy each error's fix from **Explain** into your file. On **Pro**, click **Analyze & Generate Fixes** to fix them all, then **Apply Fix**. Run **kipmox: Deploy to Org** again — repeat until it's clean (some errors are layered).
Warnings, Fix All, and custom rules
## 2. Fix a deployment error
Deploy from VS Code — when it fails, kipmox catches every error and helps you fix it.
Right-click a file (or use the Command Palette) and choose **kipmox: Deploy to Org**.
If the deploy fails, the **Deploy Errors** panel opens with every error listed. Click **Explain** on any error for a plain-English analysis and a fix.
On **Free**, copy each error's fix from **Explain** into your file. On **Pro**, click **Analyze & Generate Fixes** to fix them all, then **Apply Fix**. Run **kipmox: Deploy to Org** again — repeat until it's clean (some errors are layered).
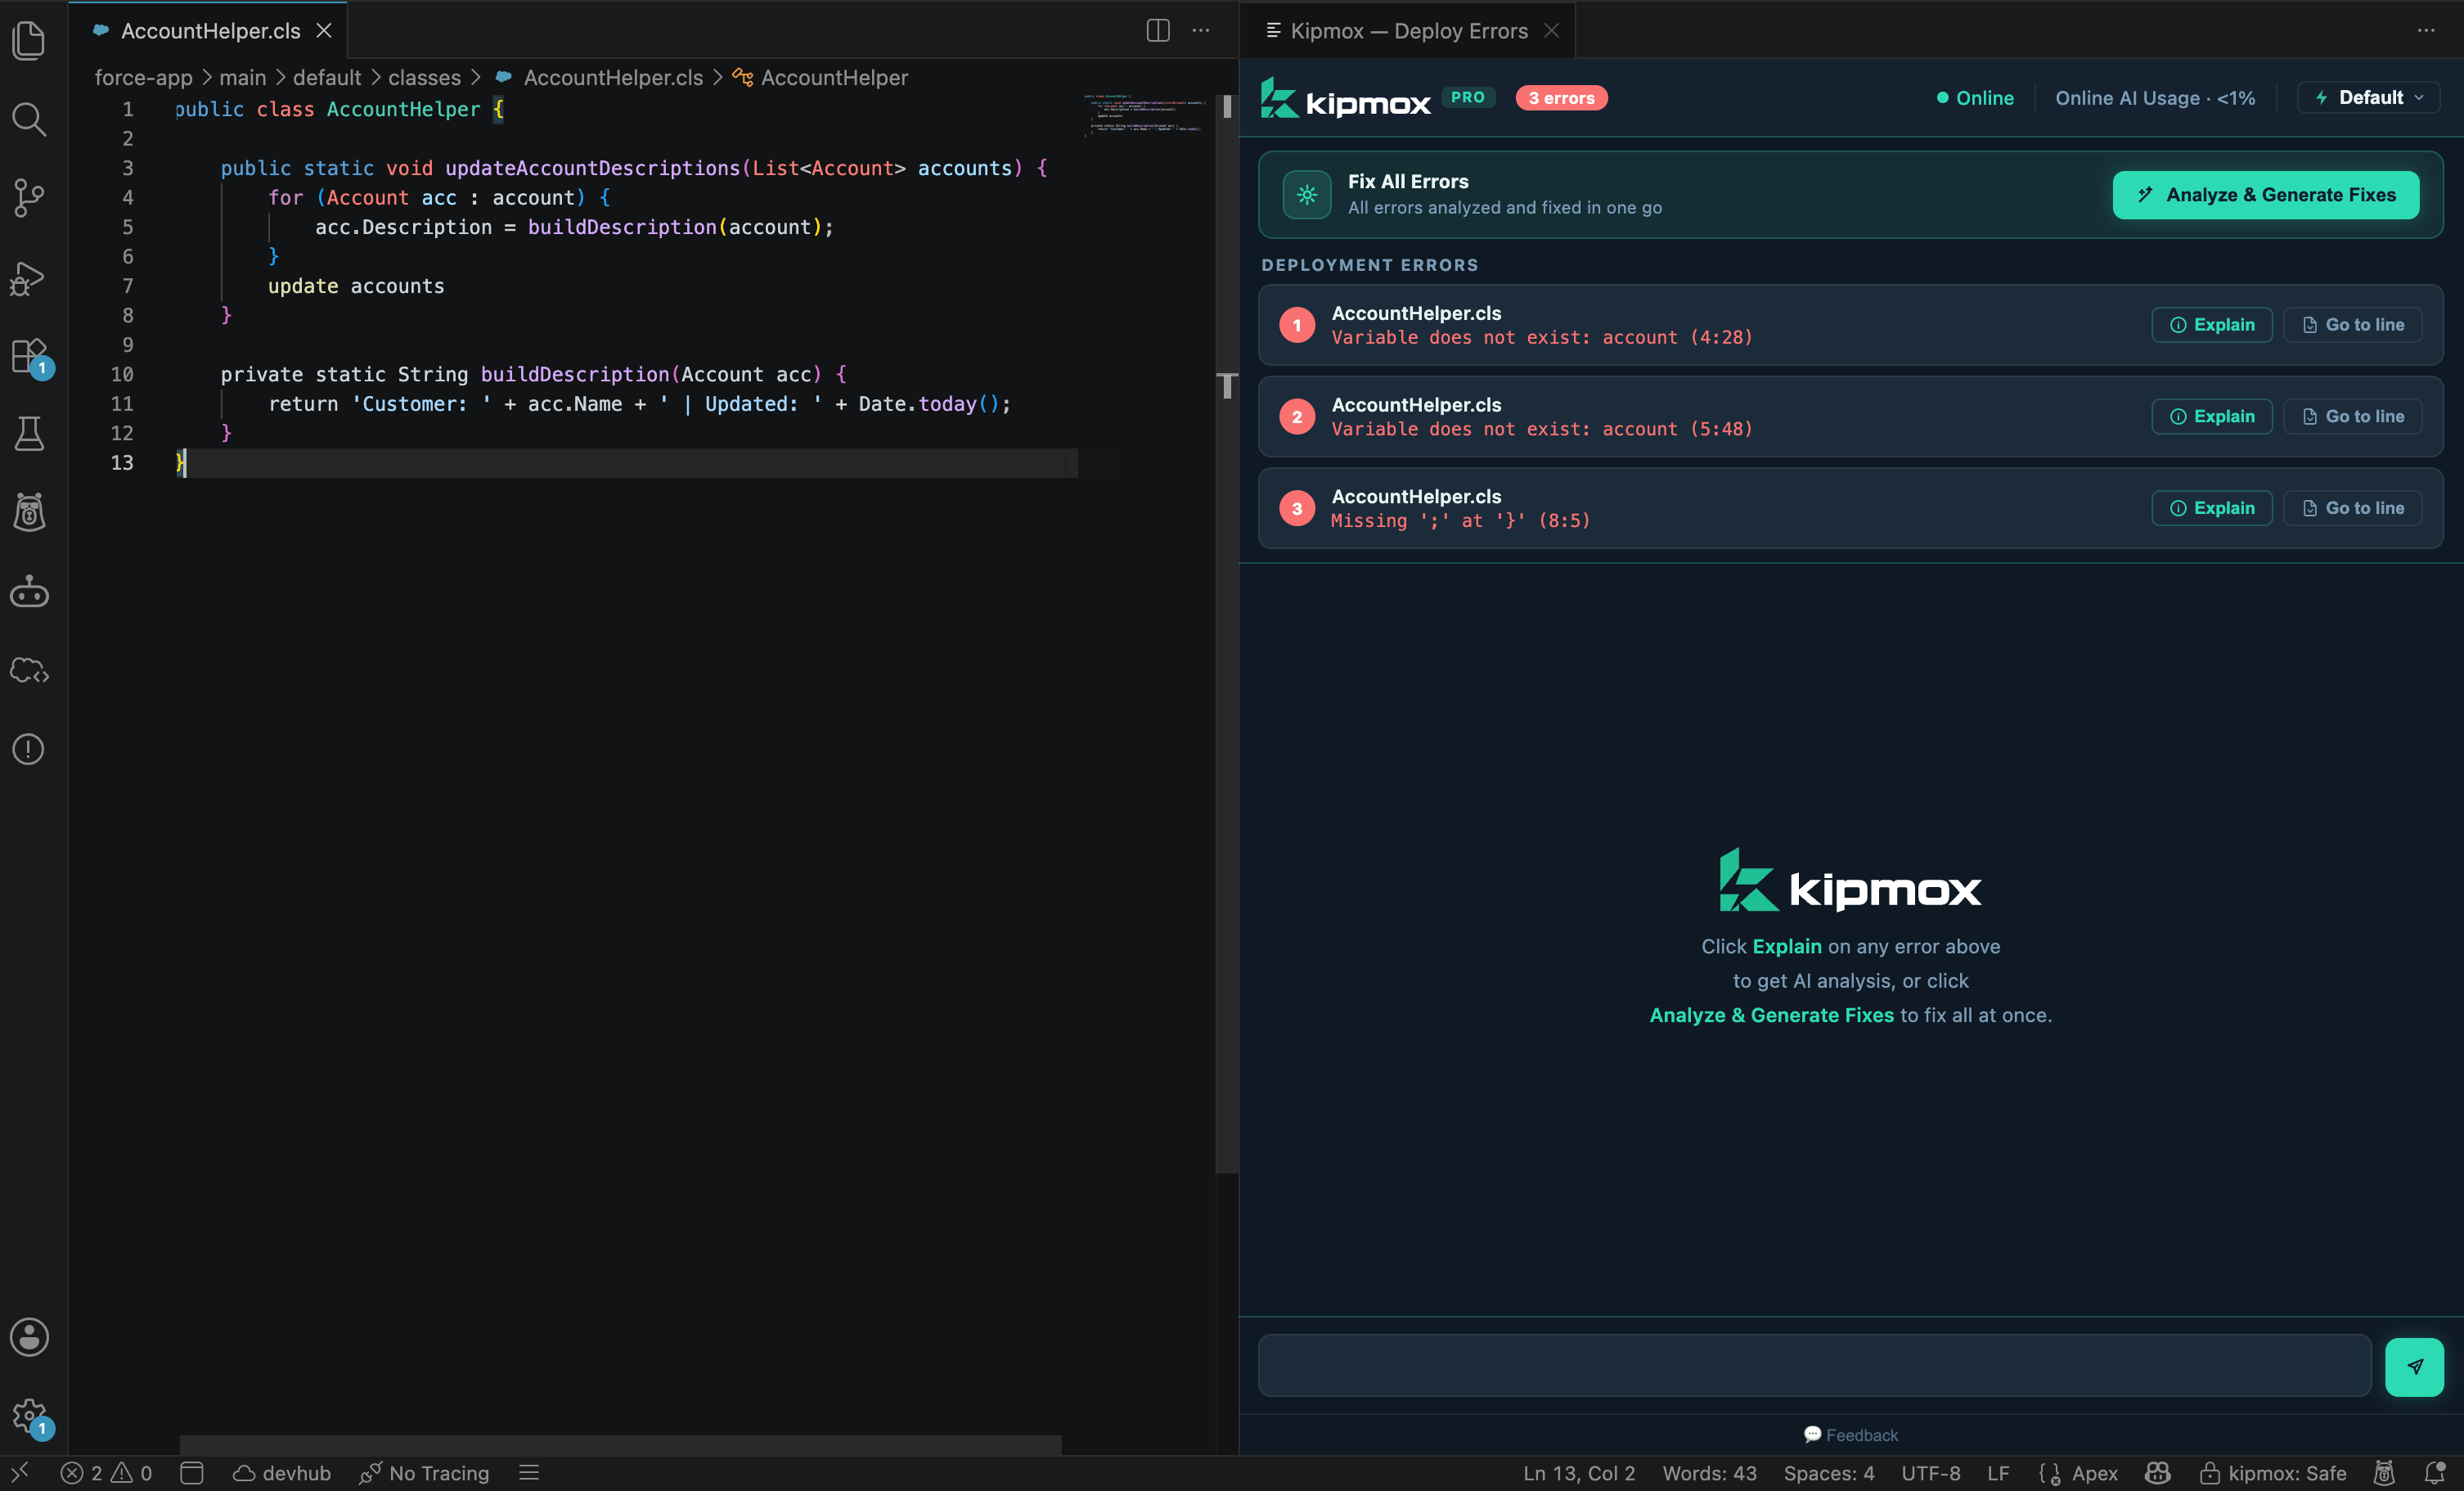 In the Deploy Errors panel, **Explain** (understand + copy a fix) is on every plan. **Analyze & Generate Fixes** (fix them all) and one-click **Apply Fix** are Pro.
Deploying, plus the fix engine end to end
## 3. Generate documentation
Turn any file into a clear technical document — straight from your source.
Open any Apex class, trigger, or LWC.
Use the Command Palette and choose **kipmox: Explain this code**.
A document opens beside your editor — overview, key methods, and dependencies.
In the Deploy Errors panel, **Explain** (understand + copy a fix) is on every plan. **Analyze & Generate Fixes** (fix them all) and one-click **Apply Fix** are Pro.
Deploying, plus the fix engine end to end
## 3. Generate documentation
Turn any file into a clear technical document — straight from your source.
Open any Apex class, trigger, or LWC.
Use the Command Palette and choose **kipmox: Explain this code**.
A document opens beside your editor — overview, key methods, and dependencies.
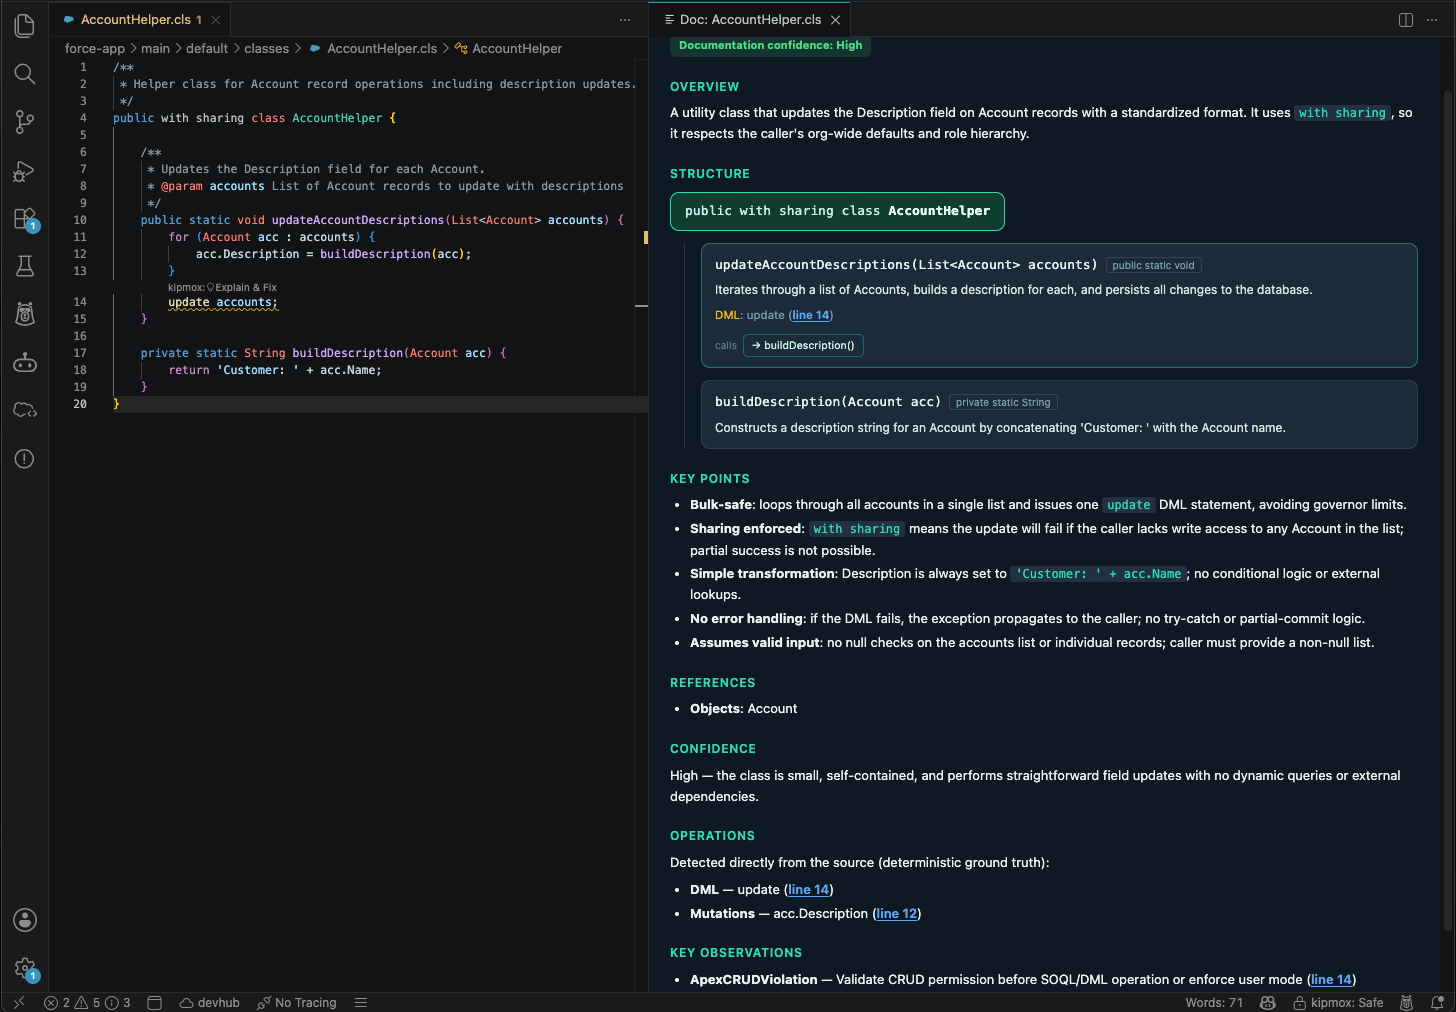 What's in a document, and online vs offline
## Online or offline
All three of the above — fixes, analysis, and documentation — work two ways. Switch anytime with **kipmox: Toggle Online / Offline Mode**:
* **Online** — kipmox's cloud AI. Fast, nothing to set up (the default).
* **Offline** (Pro) — a local model on your own machine, so your code never leaves your computer. See [Offline Mode](/configuration/offline-mode) to set it up.
## Common questions
Your first 2 requests are free with no account. From the 3rd request, kipmox prompts you to sign in with a magic link — or sign in at [kipmox.com](https://kipmox.com). Full steps in [Installation → Sign in](/getting-started/installation#sign-in).
The Free plan includes **15 deployment-error fixes and 2 code documents every 4 hours**; each resets 4 hours after you reach it. Static analysis, viewing warnings, and deploying don't count. Upgrade to Pro to remove the limits — see [Plans & Limits](/help/plans-and-limits).
Bulk **Analyze & Generate Fixes** — fixing every deployment error at once — is a Pro feature. On the Free plan, use **Explain** on each error and copy the fixed code into your file. One-click **Apply Fix** is also Pro.
The panel opens when kipmox detects errors in the Salesforce CLI output. Make sure you used **kipmox: Deploy to Org** — kipmox only monitors its own deploys, not the standard CLI command.
Some errors are layered — fixing one can reveal another underneath. Run **kipmox: Deploy to Org** again and repeat the cycle until it's clean.
The checks behind every fix
Free, Pro, and Enterprise
What's in a document, and online vs offline
## Online or offline
All three of the above — fixes, analysis, and documentation — work two ways. Switch anytime with **kipmox: Toggle Online / Offline Mode**:
* **Online** — kipmox's cloud AI. Fast, nothing to set up (the default).
* **Offline** (Pro) — a local model on your own machine, so your code never leaves your computer. See [Offline Mode](/configuration/offline-mode) to set it up.
## Common questions
Your first 2 requests are free with no account. From the 3rd request, kipmox prompts you to sign in with a magic link — or sign in at [kipmox.com](https://kipmox.com). Full steps in [Installation → Sign in](/getting-started/installation#sign-in).
The Free plan includes **15 deployment-error fixes and 2 code documents every 4 hours**; each resets 4 hours after you reach it. Static analysis, viewing warnings, and deploying don't count. Upgrade to Pro to remove the limits — see [Plans & Limits](/help/plans-and-limits).
Bulk **Analyze & Generate Fixes** — fixing every deployment error at once — is a Pro feature. On the Free plan, use **Explain** on each error and copy the fixed code into your file. One-click **Apply Fix** is also Pro.
The panel opens when kipmox detects errors in the Salesforce CLI output. Make sure you used **kipmox: Deploy to Org** — kipmox only monitors its own deploys, not the standard CLI command.
Some errors are layered — fixing one can reveal another underneath. Run **kipmox: Deploy to Org** again and repeat the cycle until it's clean.
The checks behind every fix
Free, Pro, and Enterprise