

Set up the Salesforce Code Analyzer
kipmox’s richest analysis comes from the Salesforce Code Analyzer — the same PMD and ESLint engines Salesforce ships — combined with kipmox’s own Salesforce-specific rules. Installing it is strongly recommended. Without it, kipmox falls back to a smaller set of built-in rules, so you’ll see fewer warnings.1
Install Java (required by the analyzer)
The Code Analyzer’s Apex rules run on Java 11 or later — this is the dependency most people are missing. Install a JDK (for example Adoptium Temurin), then confirm it’s on your PATH:If this prints a version (11 or higher), you’re good.
2
Install the Code Analyzer plugin
Add it to your Salesforce CLI:Already have it?
sf plugins lists your installed plugins.3
Verify it runs
No Python needed. kipmox analyses Apex and LWC code, so it disables the analyzer’s Flow engine — the only one that requires Python. You do not need to install Python for code analysis.
If the Code Analyzer isn’t installed, kipmox still analyses your code using its own built-in Salesforce rules — you just get a narrower set of findings. Install the analyzer (and Java) for full coverage. You can turn this fallback off with the
kipmox.analysis.allowInternalRulesFallback setting.When analysis runs
kipmox analyses a file in one of two ways — it does not analyse automatically when you first open a file:- Save the file (after a change), or
- Run kipmox: Re-analyse File — from the Command Palette (
Cmd+Shift+P/Ctrl+Shift+P), or by right-clicking the file in the editor or the Explorer
- Affected lines are highlighted in the editor
- A kipmox: 💡 Explain & Fix CodeLens link appears above each flagged line
- Hover over a highlighted line for a quick summary of the issue
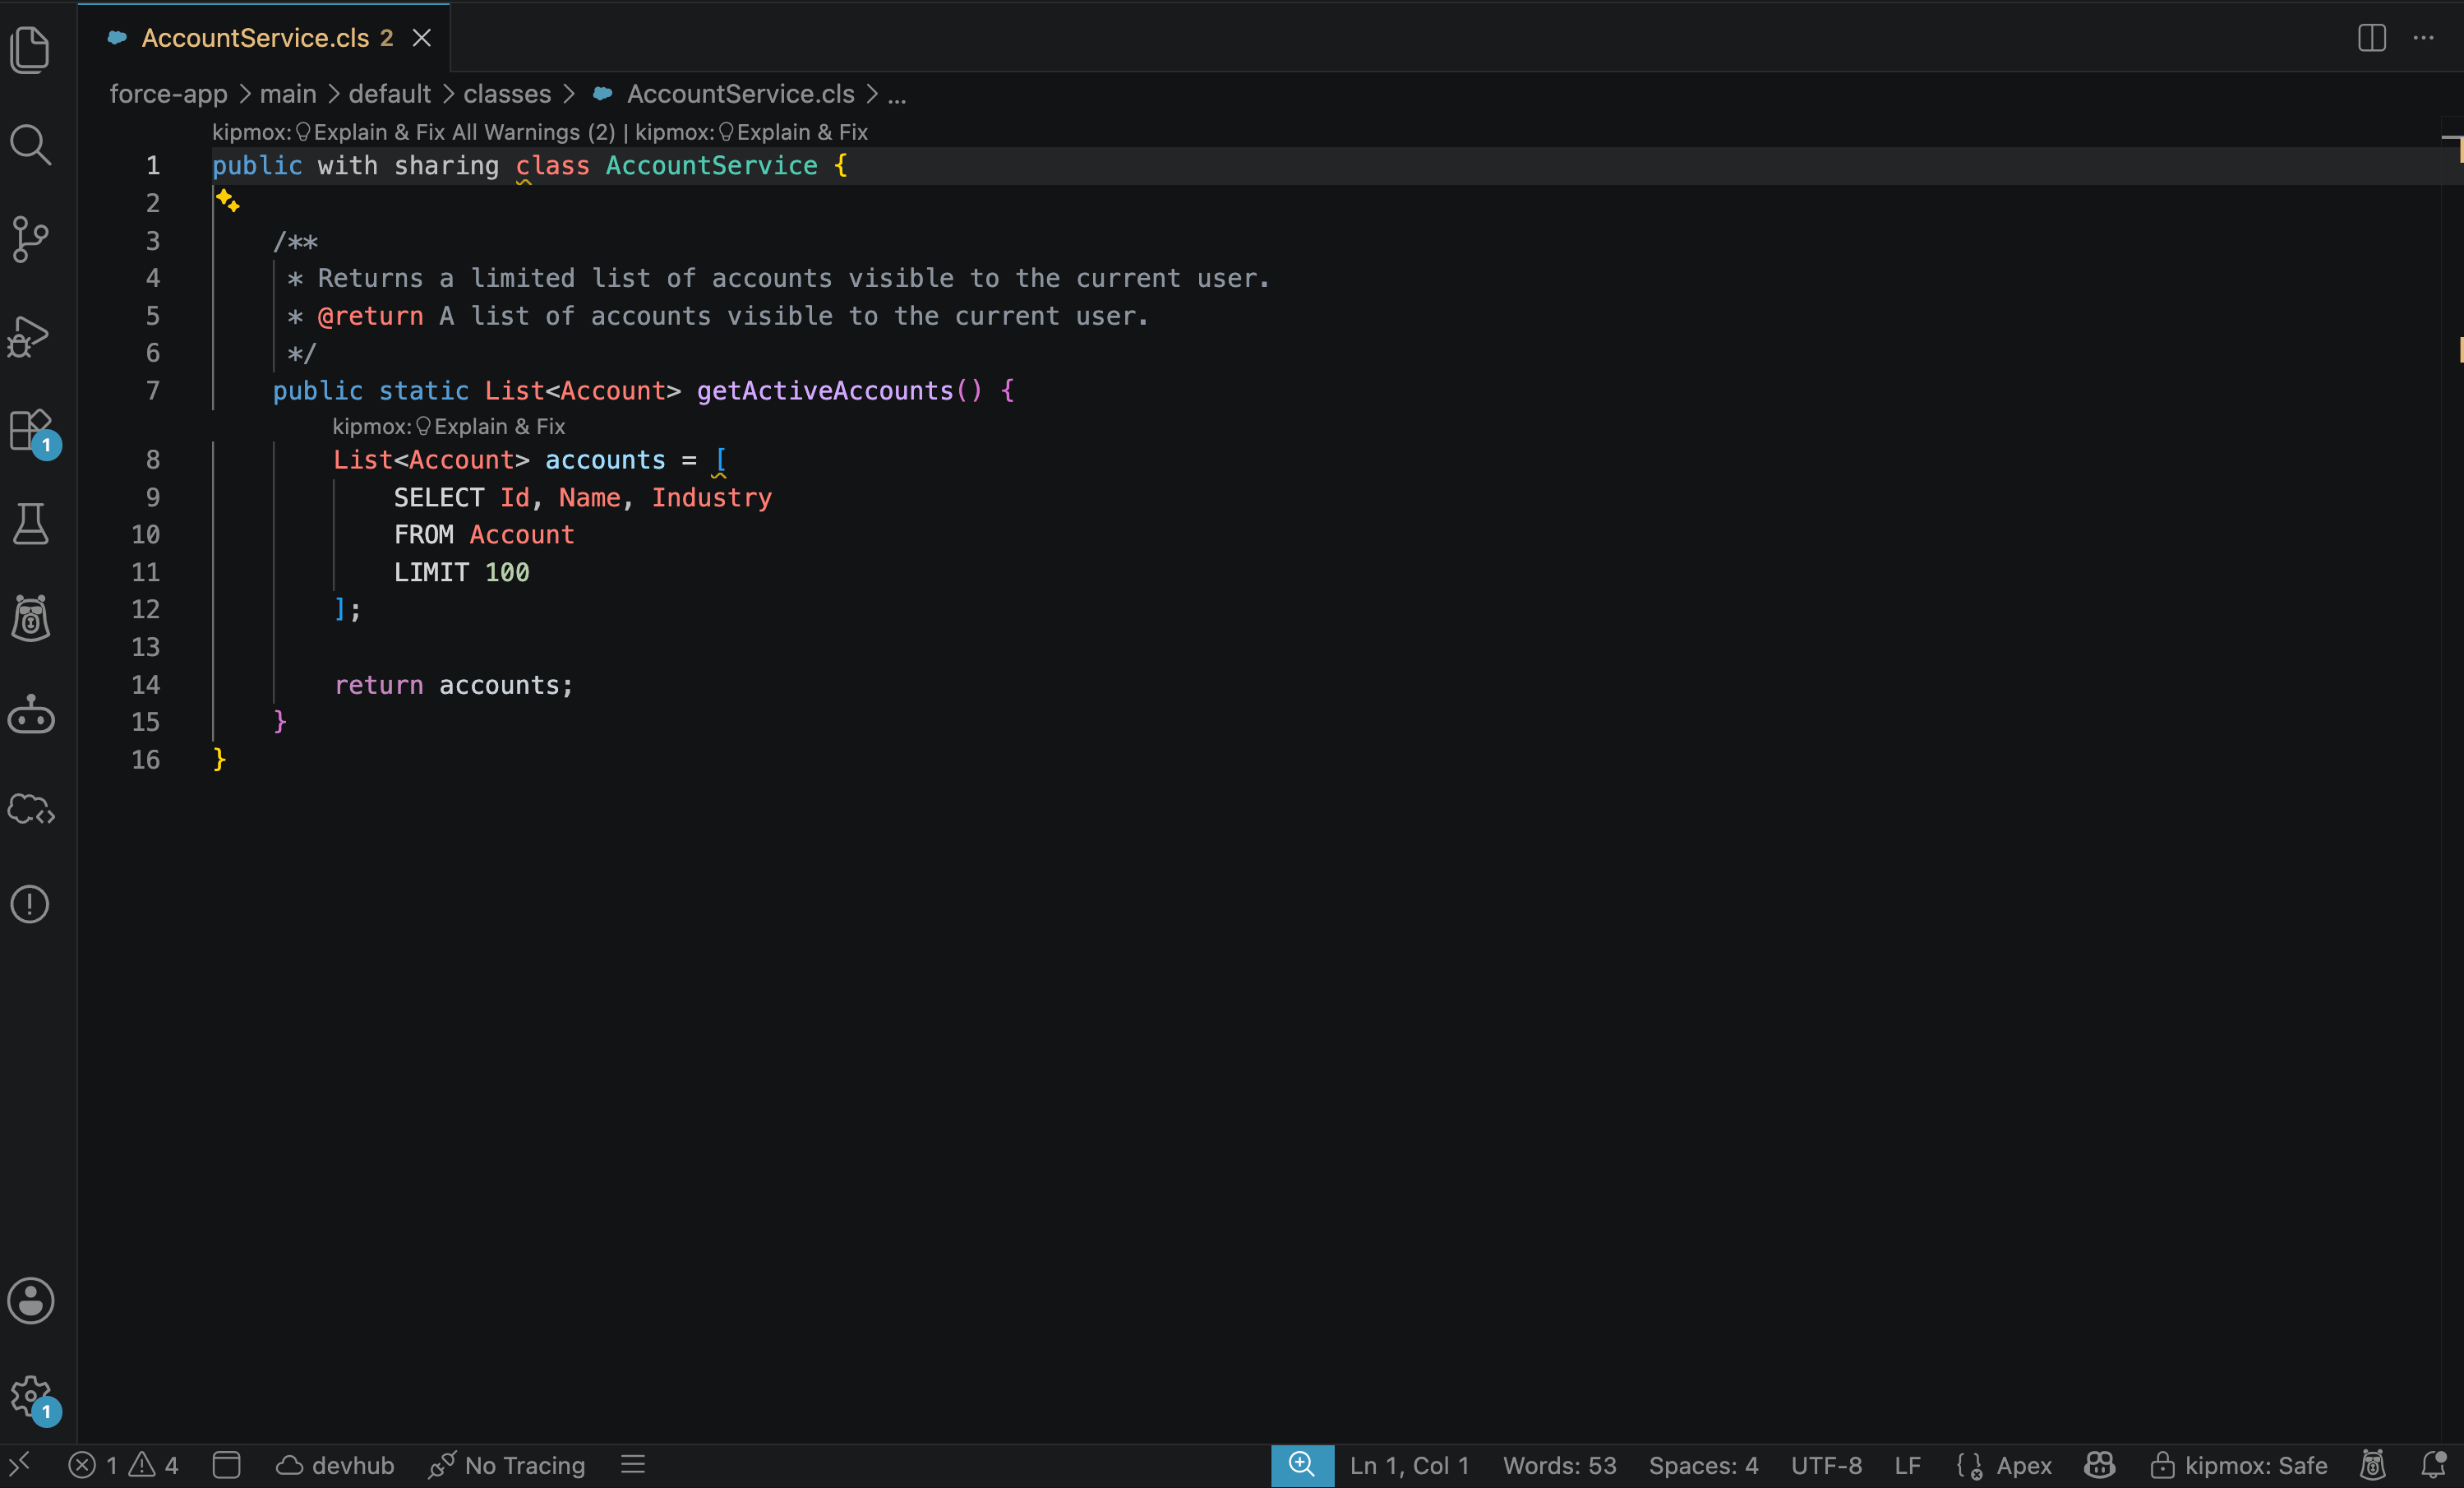
Explain & Fix
Click kipmox: 💡 Explain & Fix above any flagged line to open the kipmox — Code Analysis panel. This addresses only that one issue — the warning on that line. To fix every warning in the file at once, use Explain & Fix All Warnings (below). The panel shows:- The issue title and category (Security / Governor Limit / Code Quality)
- Confidence and risk ratings
- A plain-English explanation of the issue
- Fixed Code — the corrected code for that issue
- What Changed — a summary of exactly what was modified and why
- Overall Summary — confidence and risk for the fix
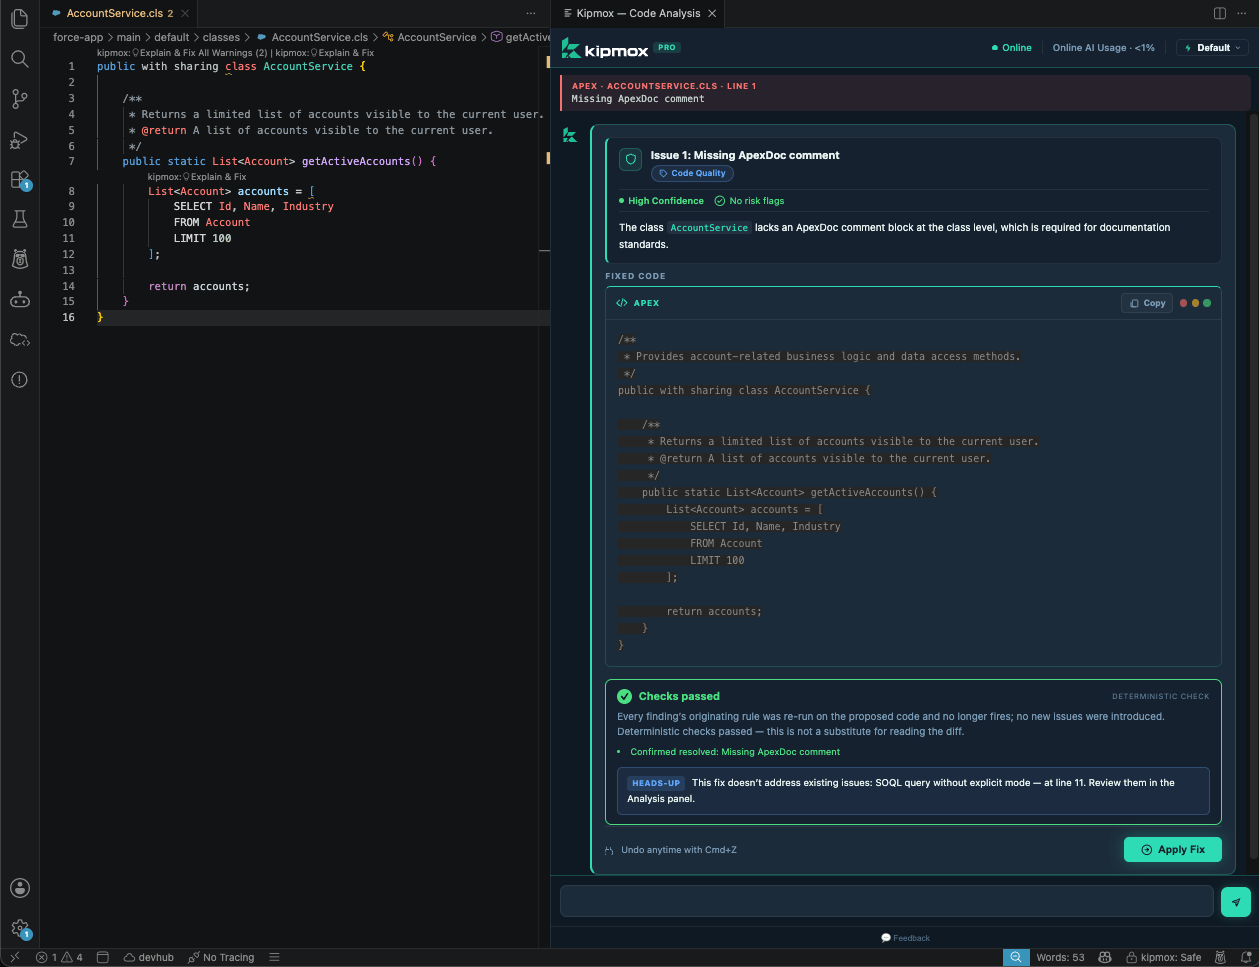
Applying a fix
On Pro, click Apply Fix to apply the change. The button changes to Fix Applied, changed lines highlight green, and kipmox saves the file automatically: “kipmox: Fix applied — changed lines highlighted in green. Undo anytime with Cmd+Z.” To revert, click Undo Fix or pressCmd+Z / Ctrl+Z.
On Free, kipmox shows the full analysis and the corrected code — copy it and paste it into your file. One-click Apply Fix, bulk Fix All, and Auto Fix Mode are Pro.
On the Free plan, fixes are limited to 15 every 4 hours — see Plans & Limits.
Pro — Explain & Fix All Warnings
On Pro, a kipmox: 💡 Explain & Fix All Warnings (n) CodeLens link appears at the top of the file — wheren is the total number of warnings found. Click it to analyse and fix every issue in the file at once.
The Code Analysis panel opens with:
- Every issue listed with its category, confidence, and explanation
- Fixed Code — the fully corrected file
- What Changed — every issue summarised in one list
- Overall Summary — combined confidence and risk across all fixes
- Apply Fix — applies all changes in one click. Changed lines highlight green and the file saves automatically; Undo Fix (or
Cmd+Z) reverts
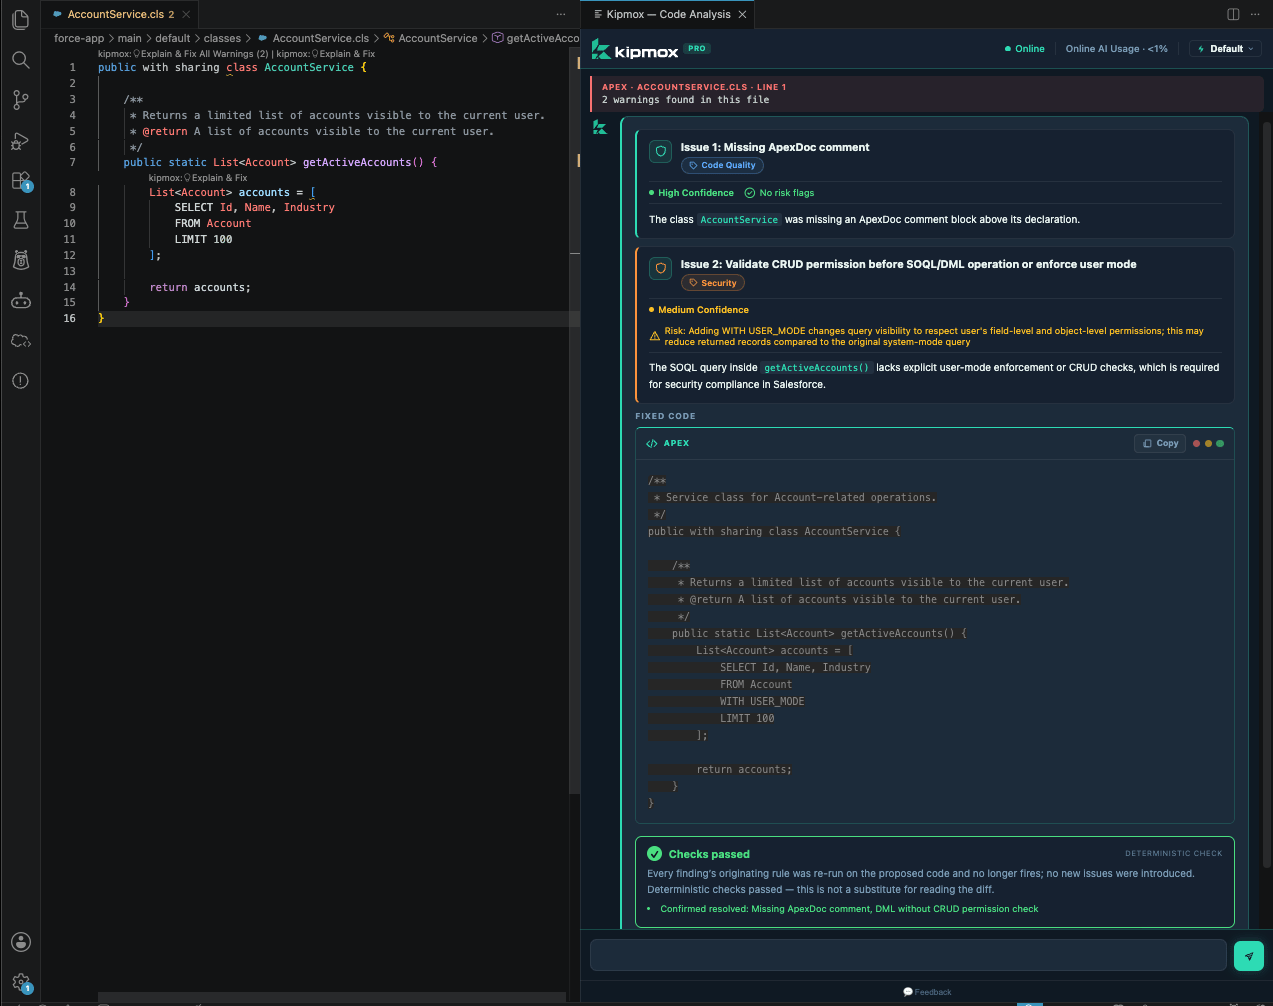
Explain & Fix All Warnings is not visible to Free plan users. Upgrade to Pro to access it.
The Code Analysis panel
Both Explain & Fix and Explain & Fix All Warnings open the same kipmox — Code Analysis panel. It includes a chat input at the bottom — use it to ask follow-up questions about the issue, request an alternative fix, or understand the Salesforce context in more detail. On the Free plan, usage counts toward your 4-hour limits — see Plans & Limits.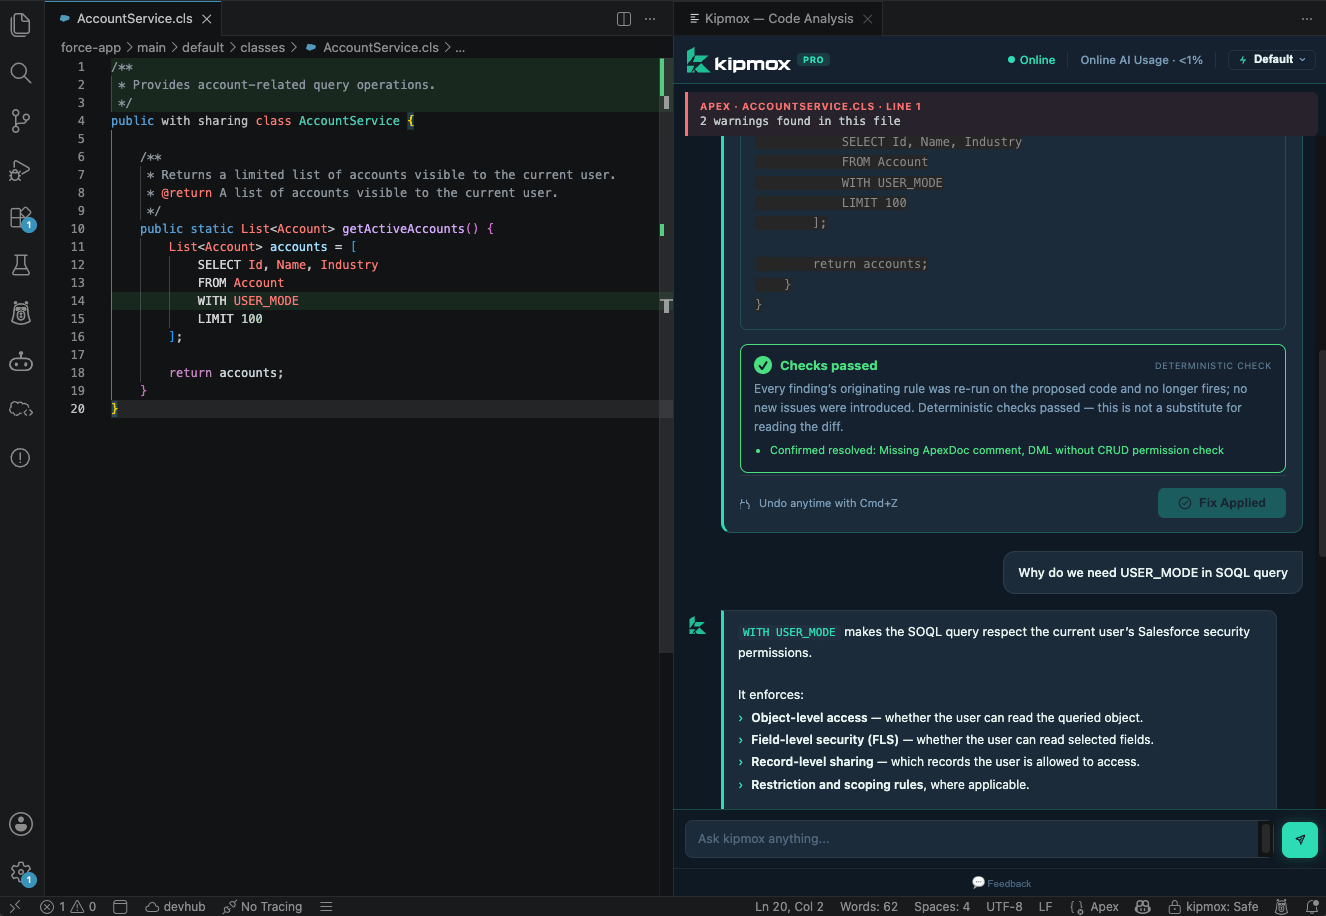
Chat messages are limited to 4,000 characters per message to ensure fair usage for all users.
What kipmox catches
kipmox analyses your code for governor limit violations, security issues, LWC best practices, and code quality problems across Apex and LWC files.Code Analysis Rules
View the full list of rules, severity levels, and what each one catches
Your own rules (custom YAML)
If your project has a static-analysis config file, kipmox applies your custom rules on top of its built-in checks — so your team’s standards are flagged the same way. Point kipmox at your file with kipmox: Set Static Analysis Config File, and remove it with kipmox: Clear Static Analysis Config File.Supported file types
Common issues
No highlighted lines or CodeLens appearing
No highlighted lines or CodeLens appearing
kipmox doesn’t analyse a file just because it’s open. Save the file (after a small change) or run kipmox: Re-analyse File from the Command Palette to analyse it. If nothing appears after that, run Developer: Reload Window and re-analyse.
Explain & Fix All Warnings not visible
Explain & Fix All Warnings not visible
Explain & Fix All Warnings is a Pro feature and is not shown to Free plan users. On the Free plan, use kipmox: 💡 Explain & Fix above each individual flagged line.
Hit the Free-plan limit
Hit the Free-plan limit
The Free plan includes 15 fixes and 2 documents every 4 hours; each resets 4 hours after you reach it. Upgrade to Pro to remove the limits — see Plans & Limits.
Suggested fix looks incorrect
Suggested fix looks incorrect
Review the confidence and risk ratings in the Code Analysis panel. For issues flagged as High Risk or Low Confidence, use the explanation to understand the problem and apply the fix manually. Use the chat input at the bottom of the panel to ask follow-up questions.
Deploy to Org
Deploy Apex and LWC, and fix errors after a failed deploy
How Fixes Are Verified
The checks behind every fix